Uncategorized

Saturday Travels

Today I drove my oldest daughter to Stephenville for state honor choir auditions. Just south of Interstate 20 is a little tiny town called Natty Flats. What makes Natty Flats so famous? The worlds largest rocking chair.


Really! It’s official – a Guinness World Record!

Uncategorized

Tutorial – REAL Turkish Corners


Christine M. over at Wardrobe Refashion posted a project involving “Faux Turkish Corners“. That started me wondering, what the heck is a non-faux vrais Turkish Corner?

Googled it, found a picture and said “Ah-ha!” That’s a pleated box corner, and my Mom taught me how to make them years and years ago! It was time to refresh my skills, and the dog bed needed refashioning, so I thought I’d make a tutorial on how to make a “Real Turkish Corner”.

There’s no before picture of the dog bed – trust me, it was disgustingly torn up, leaking cedar shavings all over the floor and ready for the trash bin. The only thing I salvaged was the zipper. The new dog bed came courtesy of a remnant from the decorator fabric shop, a large hunk of dark green heavy weight cotton twill that I snagged for a mere $4.00. I trimmed it even, stitched my “Real Turkish Corners” put in the salvaged zipper and filled the bed with cedar shavings. Max loves it.

Then, while I was on a roll, I decided to recover a raggedy pillow for Teen Daughter #2’s room, again with “Real Turkish Corners”.

104_1235 104_1237 104_1236

Here’s the Tutorial.

1. Cut two pieces of fabric the same size, one inch larger than your finished project, with squared corners. For example, if you’re covering a 16″ square pillow form, cut 2 – 17″ square pieces of fabric.

Turk Tut02

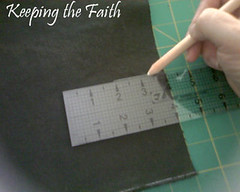
2. Decide how deep you want the finished corner to be, from the top of the pillow to the bottom of the pillow. Divide that depth by 2 and add 1″ for seam allowance. This is your marking depth. Measure the marking depth from each cut edge at the corner and make a mark. At each mark, draw a line perpendicular to the fabric edge that equals 1/2 the depth.

Turk Tut04

3. Fold the corner in half, right sides together, lining up your marked lines. Stitch along the line.

Turk Tut07 Turk Tut08

4. Open up the corner, line up the point with the seam you just made and press flat. Stitch 1/8″ from the edge to hold the fold in place.

5. Repeat for all four corners on both pieces of fabric, eight total.

Turk Tut09 Turk Tut11

6. Place the two pieces of fabric right sides together, lining up the corner seam lines. Stitch around the entire piece with a 1/2″ seam, leaving one side open for turning. Trim the corners if you wish.

7. Turn. Stuff as you please, and finish off the opening by either blind stitching or by adding a zipper.

Turk Tut12

Followup: some observant folks have indicated that these pictures are dark and difficult to follow. So Right! Here’s a link to another online tutorial, with better pictures. Its’ for an entire pillow, so the first two-thirds of it are dedicated to an applique technique. Scroll down towards the end to find the turkish corner pictures.

Another Turkish Corner Tutorial

Uncategorized

Flashback Friday – The Toad Story

I’ve been sharing stories with Hillary over at The Other Mama. (Note – Hillary is adorable. I want to be her.) Anyhoo, we were sharing advice about how to clean crayon marks off of walls and out of dryers, and the Toad Tale was recalled.

Since I’ve already been tossing around ideas in my head to keep myslef diligent about posting to the blog (“Flashback Friday” is one of those ideas!) I’ll dive right in and share a Moment in Parenting Four Fab Kids.

Ahem. The Toad Story in all Its Gory Detail….don’t read if you’re squeamish.


My youngest son has always had a propensity for stashing stuff in his pockets. From the time he was big enough to stuff those chubby little fingers into a pocket, his pockets have been an unending source of unusual things – sprockets, odd inkpen parts, legos, nuts, bolts, acorns, matchbox cars, pieces of string, contraband gum and candy, snacks for later, dogfood kibble, screwdrivers and wrenches, sunglasses, homework, spare shirts, balls, transformers, trading cards…all the trappings of little-boyhood. The fact that I thought cargo pants with those big patchy pockets were just too cute when he was little didn’t help with the pocket stuffing situation.

My youngest son also liked bugs and creepy crawlies, and tended to stuff THOSE in his pockets as well, regardless of their willingness to be carried along. I’ve found geckos, lizards, mice, snakes and innumerable unidentified insects in his pockets as I’ve prepped clothing for the wash cycle over the years. Three summers ago, there was toad in the cargo pocket, and I missed it on the way into the washing machine. Toads are definitely not wash and wear. The poor thing probably made it through the wash cycle, since we have a front loader that uses a minimum amount of water. The spin cycle, however, proved to be too much for his warty little self, and all his innards sort of came out his mouth. Gross. Youngest son and his older brother were amazed and impressed with the array of toad organs, and spent a long time examining them while I tried to be nonchalant, pretending that I was not actually allowing my sons to poke around in toad guts. (Honestly, how ofen do little boys get an opportunity to see the inside of a toad out side of high school biology lab?)

We buried Mr. Toad in the back yard, and I washed the clothes all over again.